Saving Photos for the Web
For effective Web publishing, your images must strike a good balance between file size and display quality.
Saving photos for the Web may require Adobe Photoshop or Adobe ImageReady; they are geared to help you optimize your images to get fast download times without losing image qualities:
- essential details,
- colors,
- transparencies,
- or navigational elements such as image maps.
Optimizing graphics for the web means eliminating unnecessary data from an image without reducing the overall quality of the image. There are several things that can be done to help optimize images:
- Reduce image size —
- This might include creating a thumbnail of the image, if appropriate, or cropping the image.
- Reduce the number of colors —
- An image saved as a 256 color image might only use 60 of the possible 256 colors available. In this case, data about an additional 196 colors is stored with the image, making the file size larger than necessary. This option is especially useful for images that utilize solid colors.
- Use compression —
- Apply the best compression scheme for the image while adjusting the compression levels. This method for images with complex color combinations.
Here are a few steps for saving photos (and for other graphics for use in a browser and the World Wide Web).
1. In Photoshop open a picture of yourself, a self-portrait.
2. Then, select File>Save for Web.
3. Optimization settings are available via the Save for Web window in Photoshop. To begin the process of optimizing an image file, make the following menu selections berore saving photos:
File > Save for Web...
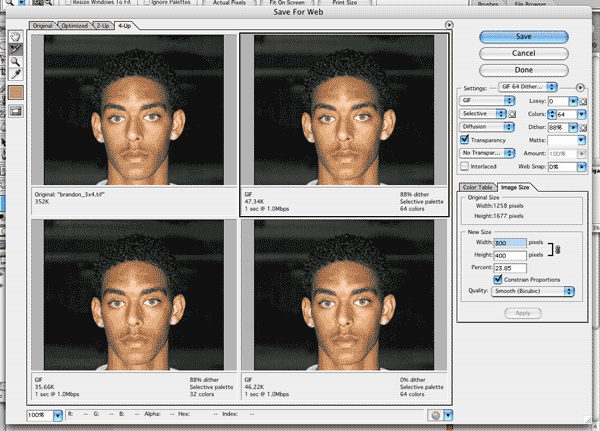
The four tabs related to saving the image for the web appear at the top of the Save for Web window as in the illustration:
- Original
- Optimized
- 2-Up — Displays the original image and the optimized image side-by-side for comparison purposes
- 4-Up — Displays four image previews; various optimization settings can be selected and compared in this tab.
The Photoshop Save for Web window provides the optimization settings to the right of the preview images. Settings for JPEG, GIF, and PNG images are available via the Settings section of the Save for Web window.
4. Select one of the image previews at a time and adjust the options in the right column to get the right balance of file size and image quality. Then, after you have adjusted the image options to your needs save your file as lastname_x_opt.xxx and drag and drop to the teacher's Drop Box.
5. Try to follow these steps; if you have a problem, ask for help.
See also http://www.adobe.com/education/pdf/cib/ps7_cib/ps7_cib14.pdf
Saving photos for the Web - FYI:
• For JPEG and GIF adjust the optimization settings to achieve balance between file size and image quality.
• The JPEG format is best for portrait photos.
• The GIF format is good for solid-color images and images with repeating colors or elements.
• The PNG format is effective at compressing solid-color images and preserving sharp detail.Saving photos for the Web fill-in
Bibliography:
http://www.adobe.com/education/instruction/webtech/CS2/unit_graphics2/mo_optim_pvir.htm#photoshop
http://www.adobe.com/education/instruction/webtech/CS2/unit_graphics1/gb_optimize_id.htm
Photoshop 7 Help: file://localhost/Applications/Adobe%20Photoshop%207/Help/help.html
Optimizing Web Images and Image Maps (Photoshop Classroom in a Book Series)